Difficulty: Intermediate | Time to first harvest: 3 to 6 months | Pressure cooker needed: Yes
Reishi is the slowest mushroom in this series to grow. It takes months rather than weeks, and it behaves differently from oyster mushrooms, lion’s mane, and shiitake in ways that can confuse beginners who expect a fast flush. But if you understand what reishi is actually doing at each stage, the process is straightforward and the end result is genuinely worth the wait.
Reishi is not primarily grown as a culinary mushroom. The taste is intensely bitter and woody, and most people who grow it do so to dry and powder it for tea, tinctures, or capsules. Growing your own gives you access to fresh reishi fruiting bodies at a fraction of the cost of buying quality extracts, and lets you use the whole mushroom rather than a processed form.
This guide focuses on the sawdust block method for indoor growing, with a section on log cultivation for those who want a longer-term outdoor setup. If you are new to mushroom growing, the complete guide to growing mushrooms at home covers spawn types, sterilisation, and substrate preparation in full detail and is the right place to start before this guide.
Why Grow Reishi at Home?
Quality reishi supplements are expensive. A dual-extracted reishi tincture or standardised extract from a reputable brand costs significantly more per gram of active compound than growing your own fruiting bodies and preparing them at home. Home grown reishi also lets you see exactly what you are working with, which matters when so many commercial products have variable quality or use mycelium on grain rather than fruiting body.
Reishi has one of the broadest health benefit profiles of any medicinal mushroom: stress and cortisol reduction, sleep quality, immune modulation, liver support, anti-inflammatory activity, and more. For the full detail on what reishi does and the research behind it, see our reishi mushroom benefits guide.
Growing reishi is also simply interesting. The fruiting body develops in stages that are visually distinct and unlike anything else you will grow. The antler stage, where it sends up cream-coloured branching stalks before opening into the characteristic flat kidney-shaped cap, is one of the more remarkable things to watch develop on a kitchen shelf.
What You Need
Essential Supplies
- Reishi spawn: Grain spawn or sawdust spawn. Both work well for the sawdust block method. Ganoderma lucidum is the species used in most research and traditional medicine. Ganoderma tsugae (hemlock reishi) is a North American relative with similar properties. Either is fine for home growing.
- Hardwood sawdust: Oak, beech, or alder. Hardwood pellets work well. No softwoods.
- Wheat bran (optional): 10 to 15 percent by weight improves yields. Reishi is somewhat less demanding about substrate nutrition than shiitake but still benefits from supplementation.
- Pressure cooker: Required for the sawdust block method. 15 PSI for 2.5 hours minimum.
- Autoclave bags: Polypropylene bags rated for pressure cooker temperatures, with filter patches.
- Spray bottle: For maintaining humidity during fruiting.
- Thermometer and hygrometer: Reishi is fairly tolerant of temperature variation but humidity monitoring is useful during the fruiting stage.
For Log Cultivation (Additional Items)
- Fresh hardwood logs: Oak or other hardwood, freshly cut within six weeks, 10 to 20cm diameter.
- Plug spawn or sawdust spawn: Plug spawn is the easiest format for log inoculation. Sawdust spawn also works and produces faster colonisation.
- Drill and 8.5mm bit, wax and brush: Same as for shiitake log inoculation.
Understanding How Reishi Grows
Reishi grows differently from every other mushroom in this series and understanding that difference prevents a lot of confusion.
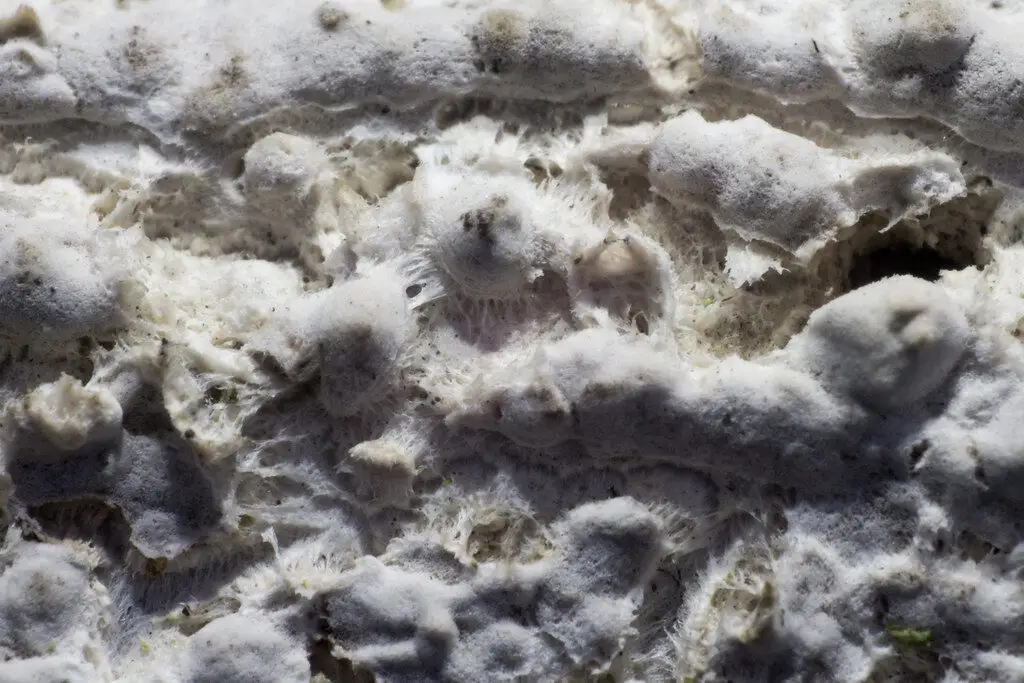
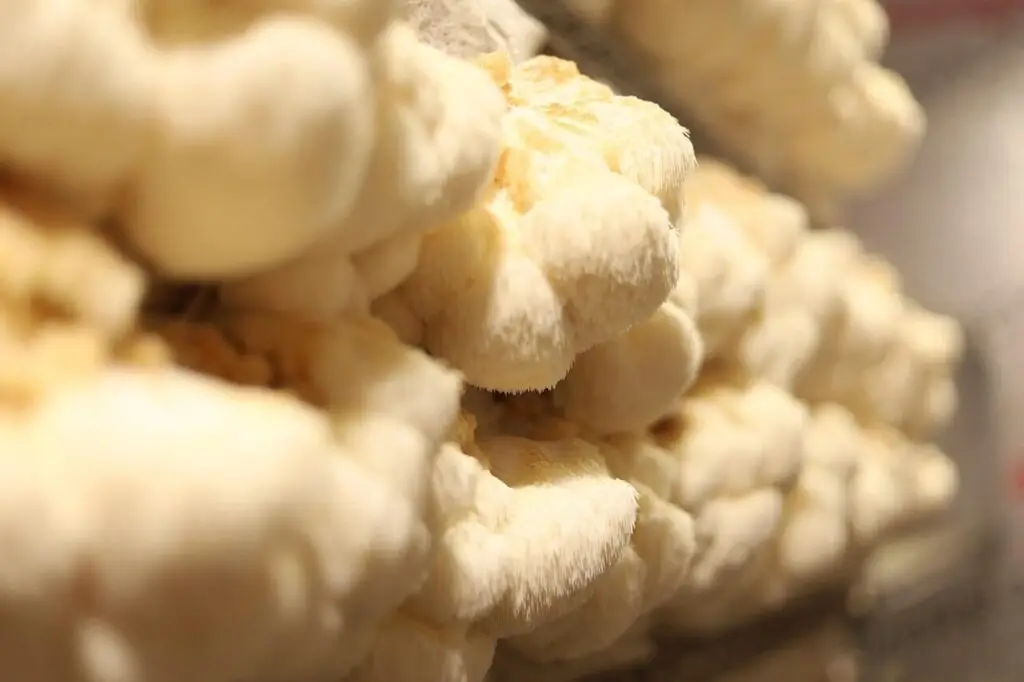
Most home-grown mushrooms produce obvious cap and stem structures relatively quickly after pinning. Reishi goes through a distinct antler phase first. When fruiting conditions are initiated, it sends up pale cream or white branching stalks that look nothing like the finished mushroom. These antlers can grow for weeks before the characteristic flat, shiny, kidney-shaped cap begins to develop at the tips.
The amount of CO2 in the fruiting environment directly controls this growth phase. High CO2 keeps reishi in antler form. Reducing CO2 through fresh air exchange triggers the transition to cap development. This is not a problem or a failure. It is how reishi develops, and you can use it deliberately: grow antlers first if you want a longer stalk, then increase fresh air exchange to trigger the cap to open.
Reishi also releases enormous quantities of spores during the mature cap stage. The spore powder is a deep rusty red or brown and can coat every surface in your growing area. Many growers harvest reishi just before or at the point when the white growing edge of the cap disappears, before heavy spore release begins.
Substrate and Sterilisation
Reishi grows on hardwood in the wild, typically on the base or roots of oak, plum, and other hardwood trees. It is well-suited to the same hardwood sawdust substrate used for lion’s mane and shiitake, and the preparation process is identical.
Recommended Substrate Mix
- Basic: 100 percent hardwood sawdust. Lower yields but lower contamination risk. Good for a first reishi grow.
- Supplemented: 85 to 90 percent hardwood sawdust, 10 to 15 percent wheat bran. Better yields. Requires reliable sterilisation.
Sterilisation Steps
- Mix sawdust and bran. Combine in a large tub and add water gradually until the substrate reaches field capacity. The squeeze test applies: a few drops when squeezed hard is correct.
- Pack into autoclave bags. Fill loosely to two thirds full. Fold the top over.
- Pressure cook at 15 PSI for 2.5 to 3 hours. Start timing once full pressure is reached.
- Cool for 12 to 24 hours before inoculating. Do not rush this step. Reishi mycelium is slower-growing than oyster or lion’s mane and even more likely to be outcompeted if introduced to warm substrate.
Inoculation
The inoculation process for reishi is the same as for lion’s mane and shiitake. Clean technique is important because reishi colonises slowly, giving any contaminating organisms more time to establish themselves before the mycelium can outcompete them.
- Wipe work surfaces with isopropyl alcohol. Wash hands and put on gloves.
- Add spawn at 15 to 20 percent of substrate weight. Break grain spawn into small pieces and distribute throughout the substrate. The more evenly spawn is distributed, the faster and more even colonisation will be.
- Mix gently, seal the bag, and label with the date.
Colonisation: The Long Wait
Reishi is the slowest coloniser of all the species covered in this series. Expect four to twelve weeks for full colonisation, depending on temperature, spawn rate, and substrate composition. This is normal. Do not assume something has gone wrong just because progress seems slow.
- Weeks 1 to 3: Little visible activity. Mycelium is establishing at spawn points.
- Weeks 3 to 6: White mycelium spreading through the substrate. Reishi mycelium often looks ropey and dense.
- Weeks 6 to 12: Progressive colonisation throughout the block. Some yellowing of the mycelium at older colonised areas is normal.
- Full colonisation: The block is firm, fully white to cream throughout, and has a distinct mushroom smell. Some blocks develop a hard outer crust similar to shiitake. This is normal.
Maintain colonisation temperature at 24 to 28C. Reishi colonises best at slightly warmer temperatures than its fruiting preference.
Initiating and Managing Fruiting
| Factor | Target range | Notes |
| Humidity | 85 to 95 percent | High humidity is important especially during antler and early cap development. |
| Temperature | 24 to 28C | Reishi prefers warmer fruiting temperatures than most other species in this series. |
| Fresh air exchange | Adjustable | Low FAE keeps reishi in antler form. Increasing FAE triggers cap development. Use this deliberately. |
| Light | Indirect, 12 hours | Reishi grows toward light. Position the light source where you want the cap to face. |
- Open or cut the bag. Once fully colonised, cut a wide opening at the top of the bag or remove the block entirely. Reishi typically fruits from the top of the block.
- Move to your fruiting environment. 24 to 28C with high humidity and indirect light. A warm room or a grow tent with a small heat mat works well.
- Begin misting. Mist the walls and substrate surface two to three times daily. Reishi responds well to consistent humidity.
- Allow the antler stage to develop. White or cream stalks will appear first. This is the antler stage. Keep CO2 slightly elevated (less fresh air exchange than you would use for oyster mushrooms) to encourage antler elongation if you want a taller mushroom.
- Trigger cap development. Once antlers reach the height you want, increase fresh air exchange significantly. The tips will begin to flatten and spread into the characteristic kidney-shaped cap. This transition can take one to three weeks.
- Watch for the white growing edge. A white border around the edge of the developing cap indicates active growth. When this white edge disappears, the cap has finished growing and is ready to harvest.
Harvesting Your Reishi
When to Harvest
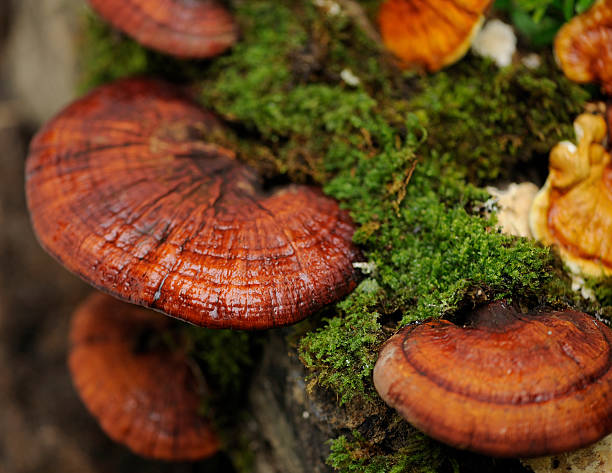
- Ready to harvest: The white growing edge around the cap has disappeared. The cap is fully formed with a glossy, lacquered appearance and deep reddish brown colour. The underside is cream or white with fine pores.
- Harvest before heavy spore release: Once the white edge is gone, the mushroom begins releasing spores. Rusty red or brown powder on surfaces below the cap is the sign. Harvest promptly at this point or your growing area will be covered in spore dust.
- Not too early: Harvesting while the white growing edge is still active means the mushroom is still developing triterpenoids and polysaccharides. Wait until it is complete.
How to Harvest
- Grip the stalk near the base and twist while pulling away from the substrate.
- Clean any stub from the fruiting surface.
- Rest the block for two to four weeks before attempting a second flush. Reishi rest periods are longer than other species.
Processing and Using Your Reishi
Fresh reishi is not typically eaten due to its bitter taste and tough texture. The most common uses are:
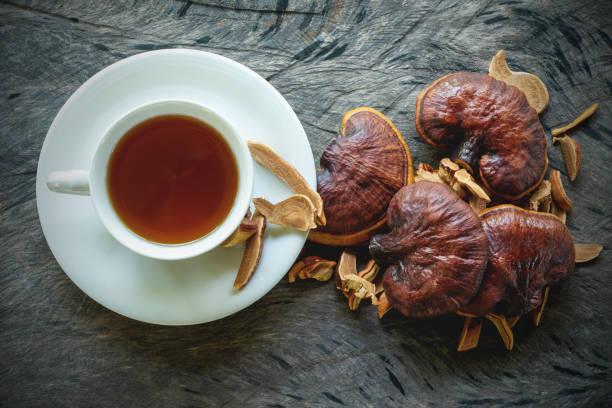
- Dried whole: Slice the cap and dehydrate at 50 to 60C for eight to twelve hours until completely dry and hard. Store in an airtight container. Use slices to make reishi tea by simmering in water for 30 to 60 minutes.
- Powdered: Grind dried slices in a high-powered blender or coffee grinder. Add to hot drinks, soups, or fill empty capsules for a home-made supplement.
- Dual extraction tincture: Simmer dried reishi in water for one to two hours (hot water extraction for polysaccharides), then soak the same material in high-proof alcohol for two to four weeks (alcohol extraction for triterpenoids). Combine both extractions. This mimics how professional dual-extracted supplements are made.
The Log Method
Reishi grows on logs in nature and log cultivation produces mushrooms with the thick caps and concentrated flavour typical of wild-harvested reishi. The process is slow: expect twelve to eighteen months before the first flush. But a single inoculated log can produce for three to five years.
- Select fresh hardwood logs. Oak is ideal. Logs should be two to four weeks old, 10 to 20cm diameter, and 60 to 90cm long.
- Drill holes in a diamond pattern. 8.5mm holes, 5 to 8cm apart in offset rows.
- Insert plug spawn and seal with wax. Standard log inoculation procedure as described in the shiitake guide.
- Store in a warm shaded location. Reishi prefers warmer conditions than shiitake. A sheltered spot that gets some warmth is better than a cold shaded corner.
- Keep moist during dry periods. Soak logs thoroughly if there has been no rain for two weeks.
- Trigger fruiting. After twelve to eighteen months, soak logs in warm water for 24 to 48 hours to trigger a flush.
Common Mistakes (And How to Avoid Them)
- Giving up during colonisation. Reishi takes much longer than any other species in this series. Four to twelve weeks of colonisation is normal. A block that looks like it has stalled is often still slowly growing. Check for contamination (green, black, or pink) but otherwise leave it alone.
- Confusing antlers with failed fruiting. When reishi sends up white stalks rather than a flat cap, beginners often think something has gone wrong. It has not. The antler stage is normal. Increase fresh air exchange to transition to cap development.
- Harvesting too early. Harvesting while the white growing edge is still present means the mushroom has not completed its development. Wait until the edge disappears completely.
- Not managing spore release. Reishi spores can coat an entire room in red-brown dust if you let the mushroom mature fully indoors without containment. Harvest at the right time or place a tray or paper beneath the cap as it matures.
- Using the wrong temperature. Reishi prefers warmer conditions than most home growers expect, around 24 to 28C. Cooler rooms slow colonisation and fruiting significantly.
- Expecting it to taste good fresh. Reishi is intensely bitter. It is a medicinal mushroom used for its compounds, not its flavour. Process it dried, powdered, or as a tincture rather than trying to cook with it.
Frequently Asked Questions
How long does reishi take to grow at home?
On a sawdust block, expect three to six months from inoculation to first harvest. Colonisation alone takes four to twelve weeks, followed by the antler and cap development stages, which add several more weeks. Log cultivation takes twelve to eighteen months before the first flush. Reishi is the slowest species in this series at every stage.
Can I eat home grown reishi?
Reishi is safe to eat but the flavour is extremely bitter and the texture is tough and woody. It is not a culinary mushroom in the same way that oyster, shiitake, or lion’s mane are. Most growers dry and powder it for tea or tinctures rather than cooking with it. Some people add small amounts of reishi powder to coffee or broth where the bitterness blends in, but it is not enjoyable in larger quantities as a cooked mushroom.
How do I make reishi tea from home grown mushrooms?
Slice dried reishi thinly and simmer two to three slices in one litre of water for 30 to 60 minutes. The longer it simmers the more bitter but also the more concentrated. Strain and drink as a tea. Adding a cinnamon stick, ginger, or a small amount of honey helps balance the bitterness. The spent reishi can be simmered again for a second lighter batch.
How many harvests can I get from one block?
Most reishi blocks produce one to two substantial flushes before the substrate is exhausted. The rest period between flushes is longer than with oyster or shiitake, typically two to four weeks. Some growers get a third flush but yields are usually significantly reduced by that point. The slow growth cycle means each harvest takes longer to develop but the cap size on a well-grown first flush can be impressive.
Reishi Rewards Patience
Reishi is not the right mushroom for someone who wants results in a few weeks. But for growers who find the longer timelines interesting rather than frustrating, it is one of the most rewarding species to cultivate at home. Watching the antler stage transition into a full glossy cap over several weeks is unlike anything else in home mycology.
Processing your own reishi into tea or tincture also gives you a product with known provenance and quality, which matters given how variable commercial reishi supplements can be.
For more in this series, see how to grow oyster mushrooms at home, how to grow lion’s mane mushrooms at home, and how to grow shiitake mushrooms at home. The complete guide to growing mushrooms at home covers all the foundational techniques in one place.