How to Grow Lion’s Mane Mushrooms at Home (Beginner’s Guide)
QUICK ANSWER
Lion’s mane grows on sterilized hardwood sawdust, requires a pressure cooker, and takes four to six weeks from inoculation to first harvest.
More demanding than oyster mushrooms but absolutely within beginner reach. The result is one of the most distinctive and valuable mushrooms you can grow at home.
If you have grown oyster mushrooms and want to try something more rewarding, lion’s mane is the natural next step. It asks a little more: a pressure cooker, a more precise fruiting environment, and a narrower harvest window. But the process is logical and the result is worth every extra step.
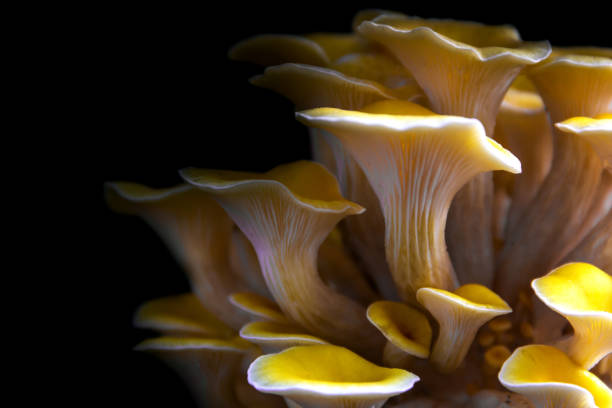
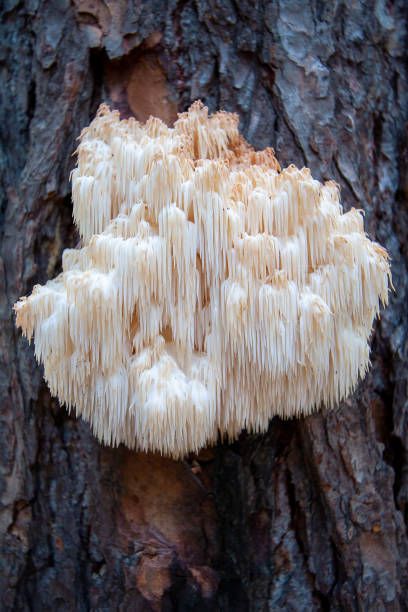
Lion’s mane grows as a single white pompom rather than a cluster of caps. A well-grown specimen looks almost otherworldly. It is also the most researched mushroom for cognitive health and nerve support, which is why so many people who start by buying lion’s mane supplements eventually end up here, growing their own. When you grow and eat fresh lion’s mane, you are consuming the actual mushroom with all of its compounds intact. No label to misread. No proprietary blend to decode.
This guide covers everything specific to lion’s mane. For general growing concepts like what spawn is, how sterilization works, and how colonization progresses, the complete beginner guide covers those in full.
📖 New to mushroom growing? Start with: How to Grow Mushrooms at Home: The Complete Beginner Guide
What you need
✅ Essential
Lion’s mane spawn — grain or sawdust, from a reputable supplier
Hardwood sawdust — oak, beech, alder. Or hardwood pellet fuel. No softwood.
Wheat bran — 10-20% by weight. Boosts yields. Optional for first grow.
Pressure cooker — 15 PSI minimum. Non-negotiable for this species.
Autoclave bags — filter patch polypropylene bags for sterilization
Spray bottle — for misting during fruiting
💡 Helpful But Not Essential
Still air box — reduces contamination risk during inoculation. Cheap to build.
Fruiting chamber — shotgun tub with perlite. Helps maintain consistent humidity.
Thermometer + hygrometer — more important for lion’s mane than oyster. Sensitive to heat.
Isopropyl alcohol (70%) — for surface cleaning before inoculation
The key difference from oyster mushroom growing is the pressure cooker. Oyster mushrooms on straw only need pasteurization (a large pot of hot water). Lion’s mane on hardwood sawdust needs full sterilization at 121C under pressure. This is non-negotiable. Attempting pasteurization with supplemented sawdust rarely works because the substrate is nutritious enough to support aggressive contamination that pasteurization cannot eliminate.
Choosing your substrate
Lion’s mane is a wood-rotting fungus. In nature it grows on the wounds of hardwood trees. Your substrate needs to replicate that woody environment. Straw does not work for lion’s mane. Hardwood sawdust is the standard.
For a first grow, plain hardwood sawdust or sawdust with 10% wheat bran is the recommendation. It gives you good results with lower contamination risk while you build confidence with the pressure cooker and sterilization process.
A note on sawdust sources: hardwood pellet fuel (plain compressed hardwood, no additives) is a popular and widely available substitute that works well. Avoid any sawdust from softwoods like pine, cedar, or fir. The resins are toxic to lion’s mane mycelium.
What Is the Best Mushroom Substrate?
Sterilize your substrate
The Process
Sterilize in Four Steps
1. Mix + Hydrate
Sawdust + bran
Field capacity moisture
→
2. Bag + Load
⅔ full, loosely packed
Into pressure cooker
→
3. Sterilize
121°C · 15 PSI
2.5 hours minimum
→
4. Cool
12-24 hours
Room temp. Do not rush.
Mix your substrate. Combine hardwood sawdust and bran (if using). Add water gradually until field capacity — squeeze a handful firmly, a few drops is correct. A stream means too wet.
Fill your bags. Pack loosely into autoclave bags, about two-thirds full. Fold the top over.
Pressure cook at 15 PSI for 2.5 hours minimum. Start timing when full pressure is reached. Larger or denser bags may need up to three hours.
Cool completely. This takes 12 to 24 hours. Do not rush it. Inoculating warm substrate is the single most common cause of failed lion’s mane grows. If the bag feels even slightly warm, wait longer.
The full sterilization process is covered in detail in the complete beginner guide.
Inoculate
Work clean and work fast. The substrate is sterile. Any contamination introduced now will compete with and likely beat your lion’s mane mycelium.
Wipe down your surface with isopropyl alcohol. Wear gloves. If you have a still air box, use it. Have everything ready before you open any bags.
Open the substrate bag, add grain spawn (15 to 20% of substrate weight), break the spawn into smaller pieces and distribute throughout, fold lightly to mix, seal, and label with the date.
For the full inoculation process, see the complete beginner guide.
Colonization
Move inoculated bags to a warm location (21 to 25C) away from direct light. Lion’s mane colonizes more slowly than oyster mushrooms. Be patient.
What to Expect
Colonization Timeline — Lion’s Mane
|
Days 1–5 |
Little to no visible activity. Mycelium establishing at spawn points. Normal. |
|
Days 5–14 |
White threads visible around spawn. May notice a pleasant mushroom smell. Do not disturb. |
|
Days 14–30 |
Mycelium spreads through substrate. Often looks ropey or cord-like. Slower than oyster. |
|
Fully white |
Block uniformly colonized and firm. Slight yellow/brown tint = metabolites (normal). Green/black/pink = contamination. |
Lion’s mane mycelium often looks ropey or cord-like rather than the even white coating you see with oyster mushrooms. This is normal. Any yellow or brown tint after full colonization is metabolite production and is also normal. Green, black, or pink is contamination.
Do not open the bags during colonization. Check visually every few days without disturbing them.
Fruiting environment
Lion’s mane is more sensitive to its fruiting conditions than oyster mushrooms. Getting these right is the difference between a beautiful pompom and a small, browning, deformed one.
The most common problem is browning. This happens when humidity drops, temperature goes above 25C, or the mushroom is left too long before harvesting. Keep your space consistently humid and cool.
The second most common problem is coral-like growth instead of a round pompom. This means too much CO2. The mycelium is producing elongated finger-like projections to find fresh air. Increase ventilation immediately.
Initiate fruiting
Once fully colonized (uniformly white and firm), cut a wide opening at the top of the bag or a large X in the side. Unlike oyster mushrooms which fruit well from narrow slits, lion’s mane does best from a single wide opening.
Move to your fruiting environment (18 to 24C, indirect light). Begin misting the air around the block three to four times daily. Avoid misting directly onto developing pins, which can cause browning. Fan the space briefly three to four times a day for air exchange.
Pins appear as small white bumps at the opening. They develop into the characteristic pompom over seven to fourteen days.
Harvest
Check your block daily once the pompom starts forming. The window between perfect and past peak can be as little as 24 hours.
Grip the base and twist gently while pulling away from the substrate. The whole growth should detach cleanly. Remove any remaining stub material.
Second flushes: Cover the block loosely, rest for seven to ten days, soak in cold water for a few hours to rehydrate, then resume fruiting conditions. Most blocks produce two flushes, sometimes three. Second flushes are smaller but worth having.
🧊
Fresh
Paper bag in fridge. 3–5 days max. Use promptly — deteriorates faster than oyster.
☀️
Dried / Powdered
Dehydrate 40–50°C. Grind to powder. Stir into coffee or tea. Lasts months.
❄️
Frozen
Saute in butter first. Freezes well after cooking. Good texture retention.
Common mistakes
Why grow lion’s mane instead of buying it
Lion’s mane is expensive to buy fresh and hard to find in most supermarkets. Supplements vary wildly in quality. Growing your own gives you access to it at peak freshness, when the hericenones and erinacines responsible for its cognitive benefits are present in the highest concentrations.
Fresh lion’s mane also has a flavour that supplements and dried powder cannot replicate. It has a mild, seafood-like taste with a dense, meaty texture that holds up well to cooking. Many people compare it to crab or lobster meat when prepared simply in butter.
If you are coming from the supplement side of this site, growing lion’s mane is the most direct way to get the benefits the research describes without relying on the supplement industry at all.
Mushroom Supplements: What Works, What’s Misleading, and How to Buy Safely
Frequently asked questions
Four to six weeks from inoculation to first harvest. Colonization takes two to four weeks on hardwood sawdust. Once fruiting is initiated, the pompom develops over seven to fourteen days.
A well-made block typically yields 150 to 400 grams of fresh mushroom per flush across two to three flushes. Lion’s mane produces single large fruiting bodies rather than clusters, so individual harvests can be impressive in size.
Almost always caused by low humidity, temperature above 25C, or harvesting too late. Check all three. If humidity and temperature are fine and browning is starting at the tips, harvest immediately. It will not reverse.
Some growers have success with pasteurized cardboard or straw as a substrate, but yields are low and success rates are inconsistent. A pressure cooker is strongly recommended and is essentially necessary for supplemented sawdust. If you do not have one yet, start with oyster mushrooms on pasteurized straw instead.
Too much CO2. The mycelium is producing elongated growth to find fresh air. Fan your fruiting area more often and ensure your chamber has adequate ventilation. The next flush should produce a more normal pompom shape.
Fresh lion’s mane contains the same active compounds (hericenones and erinacines) as supplements, often in higher concentrations because it has not been processed or stored. Many people use a combination: fresh lion’s mane for cooking and a quality extract supplement for concentrated daily intake.
Yes. Dehydrate at 40 to 50C until completely dry, then grind to powder. Stir into coffee, tea, or food. This gives you a home-produced mushroom powder where you know exactly what is in it because you grew it.
Shiitake and reishi use the same pressure cooker skills. Or go back to the complete guide.
Next steps
If lion’s mane is your first mushroom, consider trying oyster mushrooms alongside it. Oysters are faster, cheaper, and more forgiving, which gives you a success under your belt while the lion’s mane colonizes. If you have both species going, shiitake on hardwood logs is the natural third species to try.